

Table of Contents
- How Big of a Mini Split Do I Need for a 24×24 Garage?
- Understanding Mini Split Sizing Fundamentals
- Professional Load Calculations vs. Square Footage Rules
- Key Factors That Affect Garage Mini Split Sizing
- Signs Your Garage Mini Split Is Too Small
- A Step-by-Step Approach to Sizing Your Garage Mini Split
- Work with San Francisco Expert HVAC for the Right Mini Split Size
How Big of a Mini Split Do I Need for a 24×24 Garage?
Evaluating insulation and ceiling height is the first step to answering the question "How big of a mini split do I need for a 24×24 garage?" And, the truth is, there isn’t a single BTU number that suits every garage. Getting the mini split system size correct is important because an under-sized system runs continually and never reaches the desired temperature while an over-sized system wastes energy, cycles rapidly and doesn’t remove humidity.
There are several other factors that impact how a mini split system is sized. Some of these factors are the level of insulation, ceiling height, number of windows and doors and whether there are ducts in the garage. In San Francisco, where the weather is mild, a garage may not need as much capacity as a garage in a more extreme climate.
To get the right mini split for your 24×24 garage, start by understanding how BTUs relate to different garage situations and conditions. A professional load calculation, which can be obtained through HVAC services in San Francisco, can give the precise capacity your garage needs.
Key Takeaways
- When we look at a simple square-footage answer for a 24×24 garage, it gives a handy starting point.
- When sizing a mini split for a garage, many homeowners turn to simple square-footage rules—dividing the floor area by a fixed number to estimate tonnage.
- There are several unmistakable signs that reveal when a garage mini split fails to hold steady temperatures.
- When considering mini-split sizes for your garage, the following factors in addition to square footage come into play: insulation quality, ceiling height, and the coastal climate of San Francisco.
Understanding Mini Split Sizing Fundamentals
When we look at a simple square-footage answer for a 24×24 garage, it gives a handy starting point. But to get a more accurate estimate, we need to understand the fundamentals of mini split sizing. The actual cooling and heating load depends on more than just floor space.
Several key factors affect how many BTUs a space requires. Square footage is the most obvious, but insulation quality dramatically shifts the calculation. A garage with spray-foam insulation retains conditioned air much better than one with bare walls, so it often requires far fewer BTUs. Ceiling height also plays a role—taller ceilings contain more air volume that must be heated or cooled. That’s why a woodworker with a 24×35-foot shop and 22-foot ceilings might choose a 24,000 BTU unit, as shared on the Fine Woodworking Forum, and why a 26×48-foot space with 20-foot vaulted ceilings often needs the same capacity paired with supplemental heat. The number of windows and doors matters too, because each opening allows heat transfer and air leakage. Even in San Francisco’s mild climate, a garage with large south-facing windows may require more cooling capacity than one with few openings.
Climate is another critical variable. A well-insulated garage in San Francisco, with its mild summers and fog-cooled winters, may need fewer BTUs than a similar structure in a region with extreme temperatures. Higher BTUs do cool or heat larger and more demanding spaces, but oversizing can cause short cycling—the system turns on and off too frequently, which reduces humidity control and comfort. Short cycling also causes unnecessary wear on the compressor and increases energy use, so an accurately sized system runs more efficiently and lasts longer. So matching capacity to the actual load is essential.
These fundamentals give us a reliable rule of thumb, but they can only go so far. A professional load calculation takes all these variables into account precisely, and that is what we’ll look at next.
Professional Load Calculations vs. Square Footage Rules
When sizing a mini split for a garage, many homeowners turn to simple square-footage rules—dividing the floor area by a fixed number to estimate tonnage. While a quick area-based estimate provides a starting point, professional load calculations deliver far more accurate results.
The ACCA Manual J method is the industry standard for residential load calculations. It goes well beyond floor area to evaluate surface area, insulation levels, solar gain, and internal heat sources. According to the Green Building Advisor, an expert building science publication, the volume of a room—such as a garage with high ceilings—does not automatically increase the cooling load. Unless the taller walls actually increase the surface area that conducts heat, the load remains nearly the same. A 9-foot or 10-foot ceiling alone does not demand a larger unit.
Square-footage rules frequently lead to oversizing, which creates serious comfort problems. An oversized mini split short-cycles: it cools the air too quickly without running long enough to extract moisture. The result, as the Green Building Advisor notes, is a “cold and clammy” space where humidity lingers and temperature swings persist. Proper dehumidification depends on the equipment running continuously to condense water on the coil; a unit that is too large cannot do that job.
Internal heat sources must also be added to the calculation. In a garage, people and equipment generate sensible heat that directly affects the load. A typical occupant adds about 100 watts of heat, while electronics and power tools can contribute several hundred watts more. In a similar office scenario discussed on an expert building science site, three occupants and 800 watts of computer equipment added substantial load, yet a 1.5-ton recommendation from an online calculator was far too high. A thorough Manual J assessment would have trimmed that estimate dramatically.
When you are sizing a mini split for a garage, professional load calculations are the only way to account for all these variables. Oversizing risks poor humidity control and wasted energy, while undersizing leaves you uncomfortable. These calculations become especially important for garages, where insulation levels, vehicle heat, and intermittent use demand a tailored approach. We’ve seen how even a small miscalculation can turn a comfortable workshop into a damp, unpredictable space.
Professional load calculations for sizing a mini split for a garage involve more than square footage alone; specific site conditions ultimately determine the needed cooling and heating capacity. We consider four key factors that every San Francisco homeowner should evaluate before choosing equipment for a garage space.
- Insulation quality: The thermal resistance of walls, ceiling, and the garage door directly affects heat gain and loss. A well-insulated garage with an R-value of R-13 to R-38 dramatically reduces the load compared to an uninsulated space. Anecdotal reports on the Fine Woodworking forum note that spray foam insulation is often considered essential for effective mini-split performance, particularly when the garage serves as a year-round workshop.
- Ceiling height: Taller ceilings increase the air volume that must be conditioned, which raises the required capacity. One contributor to the same woodworking community describes a 24-foot by 35-foot shop with 22-foot ceilings that relies on a 24,000 BTU system. For typical residential garages with 8-foot to 12-foot ceilings in San Francisco, the effect is less pronounced but still relevant when calculating precise loads.
- Climate zone: San Francisco’s temperate marine climate moderates extreme sizing demands. In the Bay Area, mild winters mean heating loads stay modest, while summer cooling requirements rarely spike to the levels seen in inland California. Industry discussions nonetheless suggest that some inverter-driven mini-splits maintain heat output down to approximately 5 degrees Fahrenheit, providing a comfortable safety margin for our area’s occasional cold snaps.
- Intended use: Garages that double as active workshops generate additional heat from tools and equipment, and they often need enhanced air filtration to manage wood dust. Fine Woodworking users with woodshops repeatedly emphasize that standard residential filters are inadequate; they recommend supplementary filter boxes to protect the indoor coil. Even a lightly used home gym or hobby space adds internal gains that shift the load calculation upward.
Evaluating insulation, ceiling height, local climate, and how the garage is actually used helps us size a mini split that avoids short cycling on mild days while still covering peak conditions. A careful assessment of these variables keeps a San Francisco garage comfortable without the efficiency penalties of an oversized unit.
Signs Your Garage Mini Split Is Too Small
There are several unmistakable signs that reveal when a garage mini split fails to hold steady temperatures. Homeowners in San Francisco who use their garage as a workshop or hobby space often notice these red flags long before they suspect the unit is too small.
One of these signs is continuous operation. A mini split is designed to cycle on and off in order to reach the thermostat set point. If your mini split is running almost continuously, especially if outdoor temperatures aren’t extremely hot or cold, it is likely struggling to keep up and failing to meet the thermal demands of your garage. On a woodworking forum, some workshop owners mentioned that their mini splits couldn’t accommodate the thermal demand of their workshop due to the tall ceilings, and as a result, the compressor never cycled off.
Another sign is if your garage has uneven temperatures. If you notice that the area around the mini split is comfortable while other areas are significantly hotter or cooler, the unit isn’t moving enough air or delivering sufficient capacity to cover the entire space. This often happens in elongated or partitioned garages where a single mini split can’t distribute air effectively, leaving workbenches or storage areas noticeably uncomfortable.
Signs of a mini split that is too small to handle the load of your garage become most apparent in extreme conditions. A mini split that is properly sized for the load of your garage will cycle on longer in both extreme hot and extreme cold conditions to bring the room temperature to the set point and then cycle off to maintain that set point. An undersized mini split that runs continuously in extreme hot or cold conditions to try to reach the set point is a strong signal that the mini split doesn’t have the capacity to overcome the heat gain or loss of the garage envelope. Workshop owners on a woodworking forum who installed mini splits in larger shops with high ceilings often reported this exact scenario, noting that the unit became a permanent source of noise and energy waste without ever delivering true comfort.
If any of these symptoms match your experience, a professional load calculation is the next logical step. Our team at San Francisco Expert HVAC can measure your garage’s insulation, orientation, and square footage to pinpoint the right mini split capacity. Call us at (415) 371-9413 to schedule a consultation.
A Step-by-Step Approach to Sizing Your Garage Mini Split
Once you recognize the signs that your current unit is undersized or oversized—struggling to hold temperature, short cycling, or leaving the air clammy—the next step is learning how to get the perfect fit from the start. Choosing what size mini split for a 24×24 garage takes more than a quick look at square footage. We guide San Francisco homeowners through a practical sizing process that accounts for the real factors affecting heating and cooling loads in a garage setting.
The industry gold standard for equipment sizing is a Manual J load calculation, a room-by-room analysis that considers every surface, material, and heat source. Experts at that publication explain, rules of thumb based on square footage alone often lead to oversized equipment that cools the air too quickly without removing enough moisture, leaving the space cold and clammy.
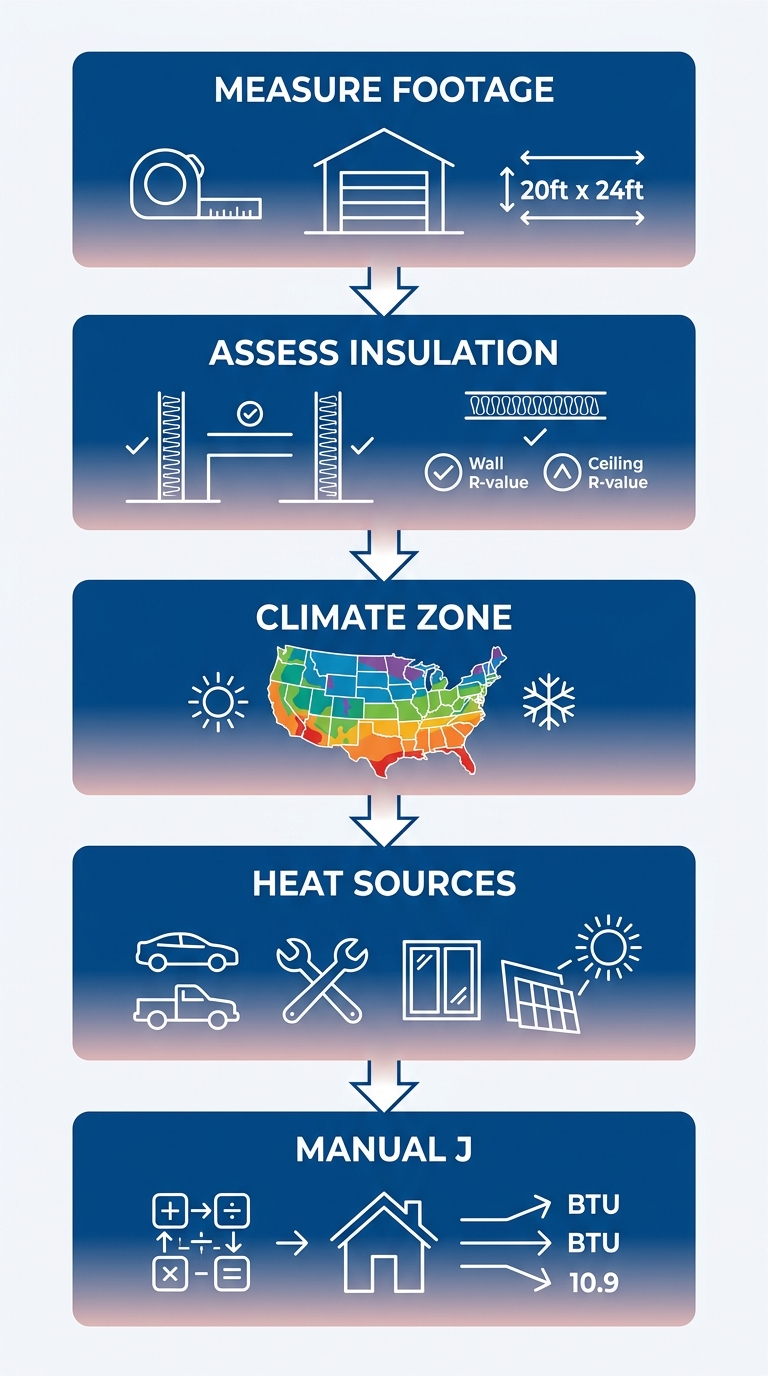
Start by gathering the key measurements of your garage, including floor area, ceiling height, and the size and orientation of windows and exterior doors. Next, assess insulation levels in the walls, ceiling, and garage door itself: spray foam and rigid foam perform differently from fiberglass batts, and a poorly insulated space demands far more capacity. Then account for internal heat sources such as workshop equipment, lighting, and how many people typically use the space. San Francisco’s mild climate moderates the extremes, yet a west-facing garage with unshaded glass can still see significant afternoon solar gain that shifts the load calculation noticeably.
To figure out the size of mini split you need, the answer is not found on a generic chart. We strongly recommend having a professional HVAC contractor perform a Manual J load calculation for your specific garage conditions. With these sizing principles in mind, you are ready to move ahead with confidence. The right professional can finalize an accurate load calculation for your garage and set you up with a system that runs efficiently from day one.
Quick Answers about Mini Split Sizing
Why is a professional load calculation more accurate than using square footage for garage HVAC sizing?
A professional load calculation uses the ACCA Manual J method, which evaluates surface area, insulation, solar gain, and internal heat sources instead of relying on square footage alone. Square-footage rules often oversize equipment, causing short cycling that leaves the space cold and clammy because the unit cannot dehumidify properly.
What are the signs that a mini split might be undersized for my specific garage setup?
Signs include the unit running almost nonstop, noticeable temperature differences between areas, and inability to reach the thermostat set point during very hot or cold weather. The compressor fails to cycle off and the space remains uncomfortable, as reported by workshop owners with high ceilings on the Fine Woodworking forum.
How do Ceiling Height and Insulation Levels Affect the Mini Split Size for my 24×24 Garage?
Higher ceilings increase the air volume that needs conditioning, which can raise the required capacity. However, load depends more on surface area; a 9-foot ceiling versus 10-foot alone may not demand a larger unit. Insulation quality has a stronger effect: a well-insulated garage with spray foam needs far fewer BTUs than an uninsulated one.
Work with San Francisco Expert HVAC for the Right Mini Split Size
When considering mini-split sizes for your garage, the following factors in addition to square footage come into play: insulation quality, ceiling height, and the coastal climate of San Francisco. A woodworking community forum discussion demonstrates that in other climates, workshop owners have also found that forgoing a load calculation leads to discomfort, poor humidity control, and higher energy costs. Variables such as air leakage, window placement, and heat generated by tools can impact capacity requirements.
San Francisco Expert HVAC has served homes in San Francisco around the clock since 1997. Our team performs detailed Manual J load calculations that account for every factor from wall R-values to heat-producing appliances, so you get a system that fits perfectly. If you’re wondering how big of a mini split you need for a 24×24 garage, we can help. Call us at (415) 371-9413 or visit us at 1725 Montgomery St to schedule a consultation.
Get Expert Mini Split Sizing
Now that you understand the key factors—from insulation and ceiling height to local climate considerations—it’s clear that getting an exact mini split size calls for more than a simple square-footage rule. Only a professional Manual J load calculation can account for all the variables in your garage, preventing issues like short cycling and poor humidity control. We’ve helped homeowners across the Bay Area get the right size for their garage mini split systems since 1997. Our team can visit your property, assess every detail, and recommend the perfect unit for reliable comfort year-round. With 24/7 availability, you can schedule a consultation at your convenience and move forward with confidence. Take the next step toward efficient cooling and heating in your garage by contacting us today.